
VR SALES CENTER
A VR Digital Twin with material switching made in Unreal Engine 5
A practice in Environment Art, VR Development and Blueprint programming

| PROJECT FEATURES:
A high fidelity digital twin of a real-life location
Natural hand-tracked interaction system
The ability to change material finishes and lighting effects
High quality rendering effects on a mobile platform
| PROGRAMS USED:
Unreal Engine 5 - Project setup and delivery
Blender - Scene modeling and UVing
Substance Designer - Material creation
Affinity Photo - Texture tweaks and touchups
| This project was borne out of excitement for what the Apple Vision Pro (AVP) could achieve in terms of realism and immersion through it’s ultra high resolution displays. My client was interested in using Unreal Engine 5 to create a demo for Quest 3 that could serve as test and a starting point for a future AVP port.
The plan was to make an app that represented a digital recreation of a builder’s design center and gave you the ability to customize the appearance of the room within the app. The idea is that the different material options would correspond with finish options on offer by the builder, so that you could explore your options with more context than a simple swatch could provide.
The initial Unreal scene
The photogrammetry scene
| WHERE IT STARTED
This project started with an initial scene that I received from my client’s intern, along with a photogrammetry scan of the space for reference. The goal was to use the intern’s model in the app, but major issues with the meshes meant the quality would not meet our needs. It was vital that things like edge bevels and high resolution textures were present. Instead of trying to clean up this scene, it ended up being easier to simply use it as a reference for new models. Thankfully, procedural mesh tools in Blender allowed me to quickly recreate most of the scene.
I did research based on the photogrammetry scene to determine things like the exact brand of Stove and TV present and modeled them based on information I found online. I then went and found the exact photos for the wall art, screensavers and TV screen. I finished by bringing in a model for the black chair I’d found online and making the other chairs and miscellaneous models. I was committed to ensuring that there would be minimal differences between the virtual scene and reality, down to the sprinklers and outlets.
After I finished remaking the scene, I got to work on setting up some material options to feed into the switching system.

A finish set inspired by the Grand Canyon

A finish set inspired by California’s forests
| MATERIAL OPTIONS
I was given the freedom to come up with my own material selections for this project, and am proud of what I came up with. Knowing that the end goal was an AVP port, I made sure to use 2K textures and smart UV scaling to make sure everything looked as sharp as possible. Substance Designer was my tool of choice for these, where I combined content from Textures.com and my own asset library to create a diverse set of options.
Once I had all of the materials made and in-engine, I got to work getting everything added to the Finish Switching blueprint.
The Blueprint responsible for handling finish switching

The finish switching UI in action
| FINISH SWITCHING
The functionality for finish switching is enabled through the use of a blueprint framework which I had created for a previous Architectural Visualization project. The framework is designed to present a user with a list of categories (cabinets, flooring, etc.) that they can then select different finishes for. That initial project was designed for controller use, so changes had to be made to get the system to work with hand tracking instead.
The system relies on blueprint actors that define what material slots on what models should be tweaked when a finish is changed, along with a collection of material options to be propagated in the UI. The Pawn receives the data from the actor once it overlaps it’s bounds, which allows you to show different options in different areas if desired. This project was small enough that all categories could be shown at once.
With this all in place, it was time to add high quality rendering effects to the materials.
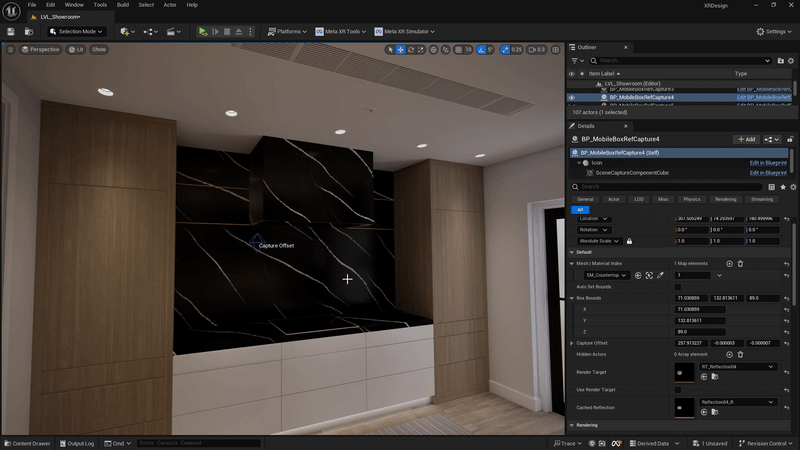
The Blueprint responsible for controlling box reflection parameters
| BOX REFLECTIONS
With maximum visual fidelity being the main goal, I made use of custom code within the materials of a few high-gloss surfaces. The custom code takes a HDR scene capture and projects it as a reflection, based on the techniques described in an old Arm article. In order to make this system easier to use, I created a blueprint which allows you to intuitively set the parameters necessary for the effect to function.
These reflections are perspective correct and look fantastic in VR. This is used to support reflections on the counter, cooktop, fireplace, bathroom door, and glass tabletop. I was able to use this effect in so many places thanks to the recent addition of compressed HDR support. This dramatically reduced the file size of each reflection capture, with no noticeable impact to quality.
By exporting the scene capture and editing it in an external DCC tool, I can use blur tools to emulate different levels of roughness. This was mainly done on the countertop and backsplash material, where the reference showed a semi-glossy surface. In the future, I’d like to set up a system for automatically capturing unique scene captures for every material combination so that you have proper reflections when changing materials.
| BIGGEST CHALLENGES
The major issues I encountered during this project were:
Tuning Lightmass Settings in UE5 (as Lumen wasn’t an option on mobile)
Updating the Android SDK properly for UE 5.4 (as I had it set up for a previous version)
It took a good bit of trial and error to get the most out of baked lighting in UE5. With advances in Lumen and other real-time lighting technologies, there has been less focus on light baking tools. One of the consequences of this is the lack if IES support in the new GPULightmass tools. With that being something that I really wanted to take advantage of, my only option was to turn to CPU lightmass and dive into the BaseLightmass.ini to try and ensure maximum quality. After a some trial and error, I was able to tune everything for a good result.
As for the Android SDK, this ended up being a slightly more challenging issue.
Unreal Engine provides a handy tool for first time setup that really does all the work for you. The issue comes if you’ve already set up a version of the tools for an older version of Unreal. The tools were not capable of updating things like the SDK and NDK to the versions they need to be for the current engine version. After spending time on troubleshooting and testing different SDK + NDK combinations, I decided to cut my losses and transfer my files to another computer where I could take advantage of the first-time setup tools.
At some point I will figure out how to ensure I can properly update dependencies for future Unreal Engine versions, but I was on the clock and needed to move on here. Once I had everything set up on the other computer, I was able to proceed without any trouble.

| IN SUMMARY
This project ended up being a great chance for me to reacquaint myself with VR development for Quest devices. I was able to learn about how the Quest 3 handles hand tracking, create a high quality optimized scene, and really get creative with the material options.
The feedback from the client after he demoed it was very positive, and it’s possible that this will be just the first of many projects like this going forward. I’m excited to see what this could look like on a device like the Apple Vision Pro, and look forward to the day I can try it for myself!